Setup & usage guide
Everything you need to transfer your files, set up your calculator, and use the search and viewer.
What you received
After purchase, you'll get an email with two things:
- A
.zipfile containing your calculator files - A 6-digit setup code for your specific calculator
Unzip the file. Inside you'll find:
NOTESMC.8xpand/orNOTESFRQ.8xp— the program(s)MCDATA.8xv,MCDAT1.8xv, etc. — your note dataMCIDX.8xv,FRQIDX.8xv— search indexes
You need all of these files. Don't skip any.
Transfer to your calculator
You need TI Connect CE software to send files from your computer to your TI-84 Plus CE.
- Download TI Connect CE from education.ti.com and open it.
- Required libraries: Go to tiny.cc/clibs. Scroll to the "Assets" section at the bottom of the page and click clibs.8xg to download it.
- Connect your calculator to your computer using the USB charging cable.
- In TI Connect CE, click the Calculator Explorer tab (the icon with multiple stacked squares).
- Select all the
.8xpand.8xvfiles from your downloaded zip folder, plus theclibs.8xgfile you just downloaded. - Drag and drop them all into the calculator window and wait for the transfer to finish.
Launch the program
If your order includes both MCQ and FRQ content, they'll be split into two separate programs. They work the same way.
Getting "ERROR: VALIDATION" or "SYNTAX"?
Some newer calculators need a quick, free compatibility step (arTIfiCE) before they can run custom programs. Watch the 2-minute tutorial to fix it.
First-time setup
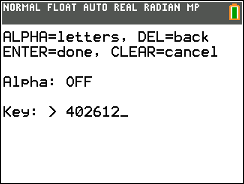
The first time you run the program, you'll see a setup screen:
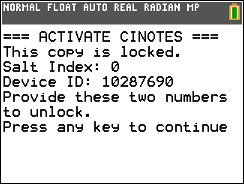

You'll see "Setup complete!" and you're in. You only have to do this once.
If you run into any issues, email support@cinotes.com with your Reference Code and Calculator ID and we'll help you out.
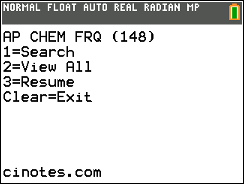
Main menu
After loading your notes, you'll see the main menu:
| Key | What it does |
|---|---|
| 1 | Search for a keyword across all notes |
| 2 | Browse all notes from the beginning |
| 3 | Pick up exactly where you left off last time |
| CLEAR | Save your spot and exit to the calculator home screen |
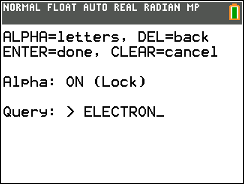
Searching for a topic
Press 1 from the main menu to search. You'll see the text input screen:
How to type on a calculator
The calculator keys normally type numbers. To type letters:
| Key | What it does |
|---|---|
| ALPHA | Type one letter (the green label above each key), then back to numbers |
| 2ND + ALPHA | Lock alpha mode — every key types its letter until you press ALPHA again |
| 0 (in alpha mode) | Type a space |
| DEL | Backspace |
| ENTER | Submit your search |
| CLEAR | Cancel and go back to the menu |
After pressing ENTER, matching notes appear in the viewer with your search term highlighted.
Reading notes
The note viewer shows one note at a time with a scrollbar on the right. If you searched for a keyword, it'll be automatically highlighted.
.png)
.png)
| Key | What it does |
|---|---|
| UP / DOWN | Scroll through the current note line by line |
| RIGHT | Jump to the next note |
| LEFT | Go back to the previous note |
| ENTER | Jump to the next keyword match within this note (search mode only) |
| CLEAR | Return to the main menu (your position is saved) |
The status bar at the bottom tells you:
- Match 1/3 — which keyword match you're on within this note
- Note 5/18 — which note out of the total search results
Exiting safely
There are two ways to leave the program:
| Key | Where | What happens |
|---|---|---|
| CLEAR | Main menu | Saves your position and exits to the TI-OS home screen |
| Y= | Anywhere | Instant exit from any screen — saves your position first |
Next time you open the program, press 3 on the main menu to resume exactly where you stopped.
Quick reference
All controls at a glance.
Main menu
| 1 | Search |
| 2 | View all notes |
| 3 | Resume previous session |
| CLEAR | Save & exit |
Text input
| ALPHA | Type one letter |
| 2ND + ALPHA | Toggle alpha lock (continuous letters) |
| DEL | Backspace |
| LEFT / RIGHT | Move cursor |
| ENTER | Submit |
| CLEAR | Cancel |
Note viewer
| UP / DOWN | Scroll within note |
| LEFT / RIGHT | Previous / next note |
| ENTER | Jump to next keyword match |
| CLEAR | Back to menu |
Anywhere
| Y= | Instant exit (saves position) |